PARTS LIST
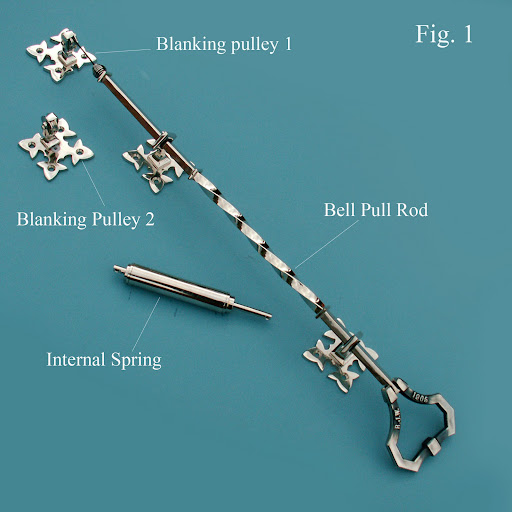
• Lichfield bell pull rod assembly
 • Internal & external blanking pulleys (2)
• Wall return spring
• Large plastic liner sleeve
• Small plastic liner sleeve
• Wall plugs and screws
• 3.5 metres of nylon cord
TOOLS REQUIRED
 • Internal & external blanking pulleys (2)
 • Wall return spring
• Large plastic liner sleeve
• Small plastic liner sleeve
• Wall plugs and screws
• 3.5 metres of nylon cord
TOOLS REQUIRED
• Electric drill
• Spirit level
• 26mm & 8mm masonry drill bits
• Slotted screwdriver
• Junior hacksaw (or similar)
• Small hammer
• Scissors
• Sandpaper
• Pliers
• Matches or cigarette lighter.
• Spirit level
• 26mm & 8mm masonry drill bits
• Slotted screwdriver
• Junior hacksaw (or similar)
• Small hammer
• Scissors
• Sandpaper
• Pliers
• Matches or cigarette lighter.
BEFORE YOU START
• Familiarise yourself, fully, with these fitting instructions as this may influence the height and location of your pull.
• The return spring is located within the wall. The wall you secure your pull to must therefore be at least 9 inches thick.
• The screws and wall plugs supplied are only suitable for use in solid walls. If fitting to other types of wall please source suitable fixings from your local hardware store.
• Ensure there are no hidden service pipes or cables where you intend to drill.
FITTING
• Step 1. With the pull rod vertical and the bottom bracket positioned approximately 25mm above the handle (see Fig.2), mark the position of the four screw holes (in this bracket) on the brickwork.
 • Step 2. Drill the four holes from Step 1 (40mm deep) using an 8mm masonry drill. Insert the shorter wall plugs and then temporarily secure the bottom bracket.
• Step 3. Ensuring that the rod is vertical and that the bottom bracket is located approx 25mm above the handle, allow the top bracket to slide down onto the top ‘stop’ collar (see Fig.3). Mark the position of the four holes (in this bracket) on the brickwork.
• Step 4. Drill the four screw holes from Step 3 (50mm deep) using an 8mm masonry drill. Insert the longer wall plugs into the holes and then temporarily secure the top bracket. The rod should now slide freely inside the bracket.
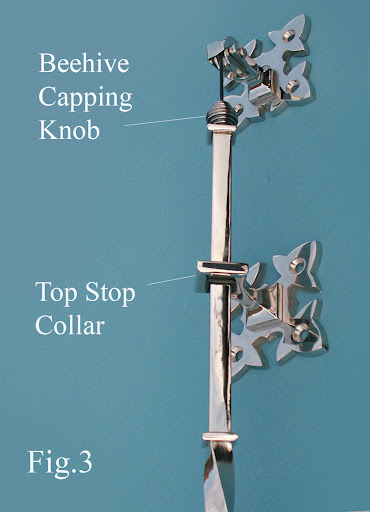 • Step 5. Position the rod so that the top ‘stop’ collar is once again touching the top bracket. Mark the wall 40mm, vertically, above the hole in the top of the Beehive capping knob. Now, remove the bell rod assembly.
• Step 7. Re-screw the bell rod assembly onto the wall.
• Step 8. Position the hole in the blanking pulley directly over the centre of the 26mm hole, making sure that the ‘V’ in the pulley is aligned with the hole in the top of the Beehive capping
knob. Mark the position of the four screw holes in the blanking pulley, on the brickwork. Before you drill these holes cover your pull with a cloth, or similar, to protect it from brick dust. Drill (50mm deep) and plug these holes with the longer wall plugs (see Step 2). N.B: Do not fit the pulley at this stage.
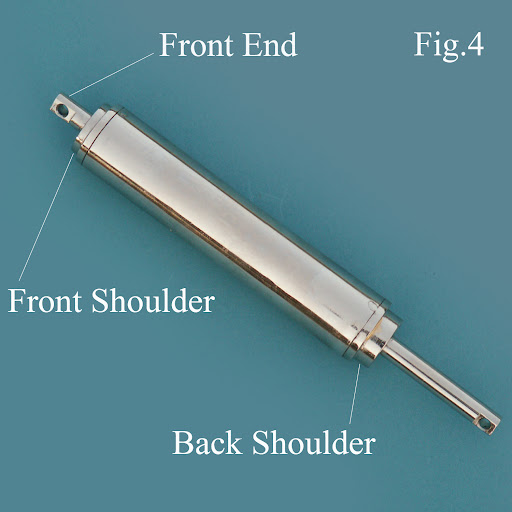
• Step 9. Cut off approximately half a metre of cord. Seal both ends of the fraying cord using the flame of a match or lighter. Attach the one end to the front of the wall return spring. Now pick up the small length of plastic tube (If you need to cut the tubing do not cut this length, cut the longer length). Pass the cord you have just attached, through this tube and slide the tube onto the front shoulder of the return spring (see Fig.4).
• Step 10. Slide approximately 300mm of the remaining length of cord through the other (longer) plastic tube. Tie this end to the back of the return spring. Now slide the tube onto the back shoulder of the return spring.
• Step 11. Tuck the cord, attached to the front of the spring, into the tube. Now, from inside the house, push this end of the spring assembly through the hole, until it is flush with the outside wall. Recover the end of the cord and pass it through the hole in the blanking pulley. Attach this blanking pulley to the outside wall.
 Step 12. From inside the house push the spring assembly, hard, onto the outside wall pulley. Mark the plastic tube where it emerges from the inside wall. To cut this tube, you will have to withdraw the spring assembly. Before you do this, tie the end of the cord on the outside wall, loosely, to the Beehive capping knob (This will prevent the cord pulling through the outside blanking pulley). Withdraw the spring assembly and remove the ‘long’ tube. Cut the tube, where marked. Replace the cut tube and return the spring assembly by pulling the cord on the outside of the house. Fit the inside blanking pulley (drilling 40mm holes) ensuring that the ‘V’ in the pulley is aligned with your bell, or your next pulley. Attach this end of cord to your bell. Seal the end of the fraying cord using the flame of a match or lighter.
Your bell pull is now ready for use.
CLEANING
Dust periodically with a soft dry cloth. (Important: If you have purchased a Lichfield bell pull in a ‘black’ finish, under no circumstances use an abrasive cloth or cleaning agent.)